Before Start.
a) Requirements
b)Install Smart PinPad DEV
c) Login
d)Set up of the terminal
e) Activation of the automatic start
f) Physical navigation buttons
g)Application Output
h) Button "Set up service response"
i) Sandbox environment
j)Special Functionalities
a) Requirements
Have one terminal Smart, if not, verify with the netpay representative team that is in charge of the integration ( To confirm that the terminal is in the proper test environment it is important to contact with the integration team or with your netpay representative to validate that the terminal it´s prepared and ready with the necessary specifications to realize the tests
Download and set up Smart PinPad DEV Application for the sandbox environment.
Request Integration Netpay team
Develop an API REST (local or through internet) for the dispatch of the request sale,cancellation or reprint forward to the terminal to process the payment
The service has to be working everytime before we process a payment or a transaction since there will be sent the operation response.
Terminal has to be able to reach the terminal service at any moment to realize properly the transaction process.
In case that the terminla indicates that it is not able to send the service response, service has to be checked and verified that it´s working properly to realize completely the transaction process.
It is reccomandable that POS has implemend a log to receiver smart response
During this process it is recommendable
It´s important comunicate with Netpay team whenever any situation that affects the terminal effectiveness and it doesnt impact from the integration beginning until the last part of it.
Stay connected with your Netpay Representative or Integrations team just to validate that the terinasl its in the proper environment.
b) Installation of the Smart PinPad DEV
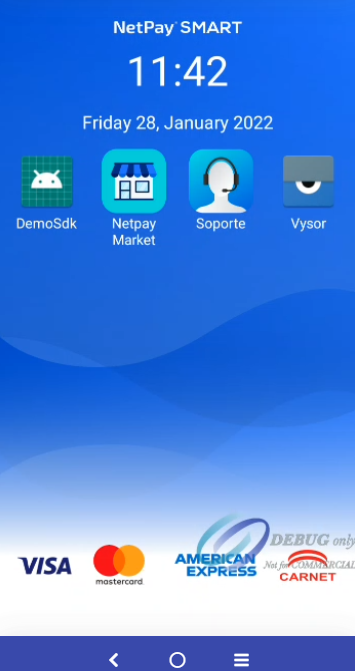
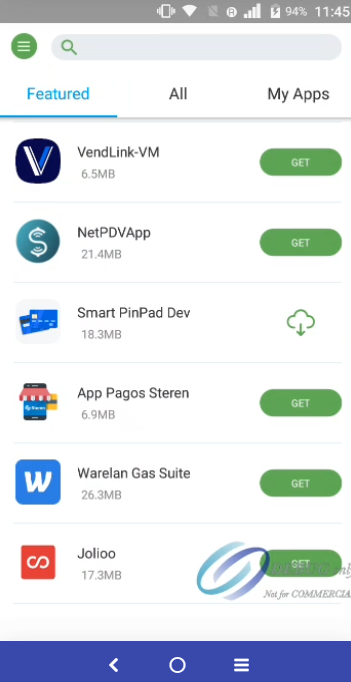
Accesss Netpay market with the application that is in the main window.
Note.Terminal POS offers store applications (Netpay Market), this one will allow you install and update applicaions, check the components status and update the terminal firmware version.
Search app “Smart PinPad DEV”, most updated version is 1.3.8.1.p.p_20221101 after it select it and click it.
Selecting "1.3.8.1.p.p_20221101" Smart PinPad DEV version this screen will pop up indicating the storage that needs to get installed, bellow that we press the INSTALL button.
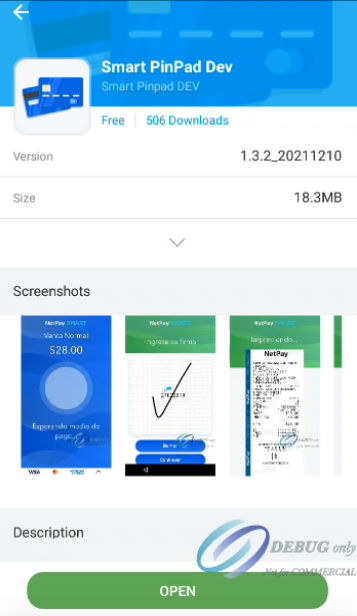
Once download starts, the bottom bar will indicate the progress of the download.

At the end of the installation, the button will change from the message "PAUSE" to "OPEN".

ERROR 13Perhaps in your Smart PinPad installation process you come across an error 13, this error is common and has a solution, please read the following steps.
This error appears when you have the Payment App installed and you want to install the Smart PinPad or vice versa, you can only have one app at the same time, since they share the same data and may cause compatibility conflicts

In this case it is necessary to request support from the NetPay team so that the application is uninstalled and the requested app installation can be carried out, do not try to uninstall the app, as it may cause problems in some scenarios.
c) Login
Enter the version of Smart PinPad on the desktop icon.
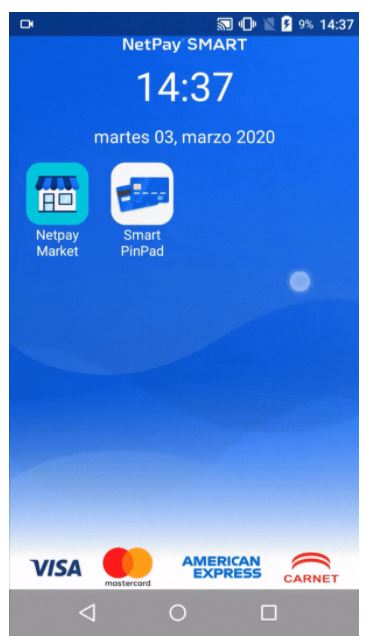
The "Welcome to Netpay Smart" screen will be displayed, then enter the Store ID and Test Password provided by the Integrations team. Press the "Start" button.
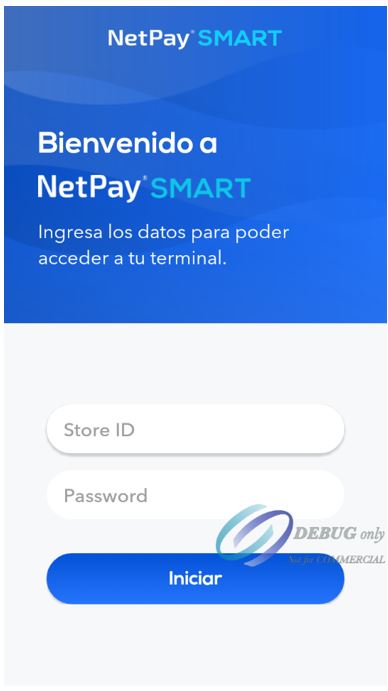
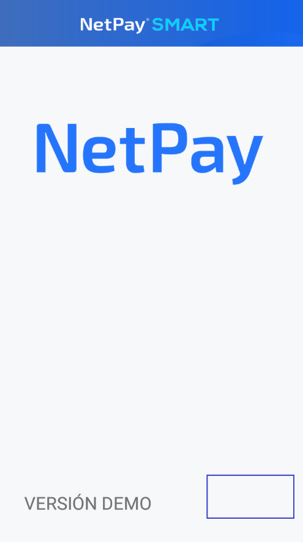
This step must be completed to be able to indicate which Store ID we will be working with. A single login must be made, which will show a blank screen with the legend "NetPay".

d) Terminal Configuration
The app has a hidden settings menu. To access it, it will be enough to press and hold for two seconds in the lower right corner so that the terminal configuration menu appears.
Detalle de la Configuración
- Operativa de venta.
- Configuración de venta.
- Seguridad
- Tipo de conexión.
- Botón "Configurar respuesta del servicio".
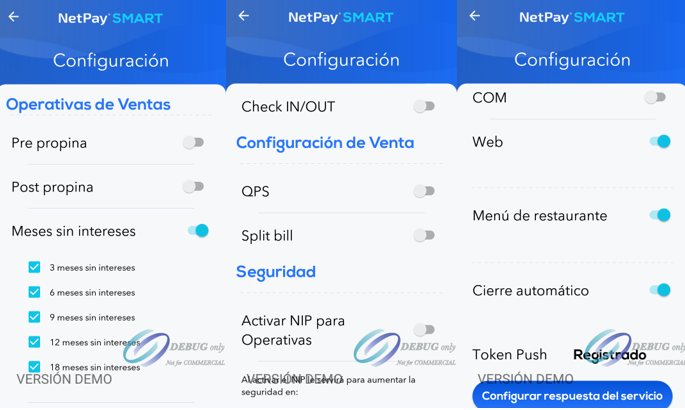
Note.The basic configuration for the terminal to have a connection with the point of sale is by activating the "Web" option and configuring the URL of the service response in the "Configure service response" button.
Sales operation
Options. | Descriptions. | Restrictions. |
|---|---|---|
Pre-tip | This option allows the restaurant business to make sales to which a percentage or a specific amount for the waiter's service can be assigned. | Available |
Post-tip | Not available at this time for Smart PinPad | Not available at this time for Smart PinPad |
Months without interest | This option allows the user to offer their customers the option of paying monthly without interest for purchases made in their store (3, 6, 9, 12 and 18 months without interest) | Available |
Check IN/OUT | Not available at this time for Smart PinPad | Not available at this time for Smart PinPad |
Sales Operation
Options | Description | Restrictions |
|---|---|---|
QPS | This option allows that when it is an amount less than or equal to $250.00, the client is not asked for the PIN of the card or signature of the transaction. | Not available at this time for Smart PinPad |
Split bill | When this option is enabled, the merchant can offer the customer the payment of separate accounts. | Not available at this time for Smart PinPad |
Security
Opciones | Descripción | Restricciones. |
|---|---|---|
Activate PIN for Operations | If it is required to enter a password to enter the settings and operations menu. | Available |
Tipo de conexión
Opciones | Descripción | Restricciones. |
|---|---|---|
COM | This option is applicable for integrations via COMM | N/A |
Web | It allows us to communicate with the terminal through web services. | Available This option is essential so that you can receive requests from the server |
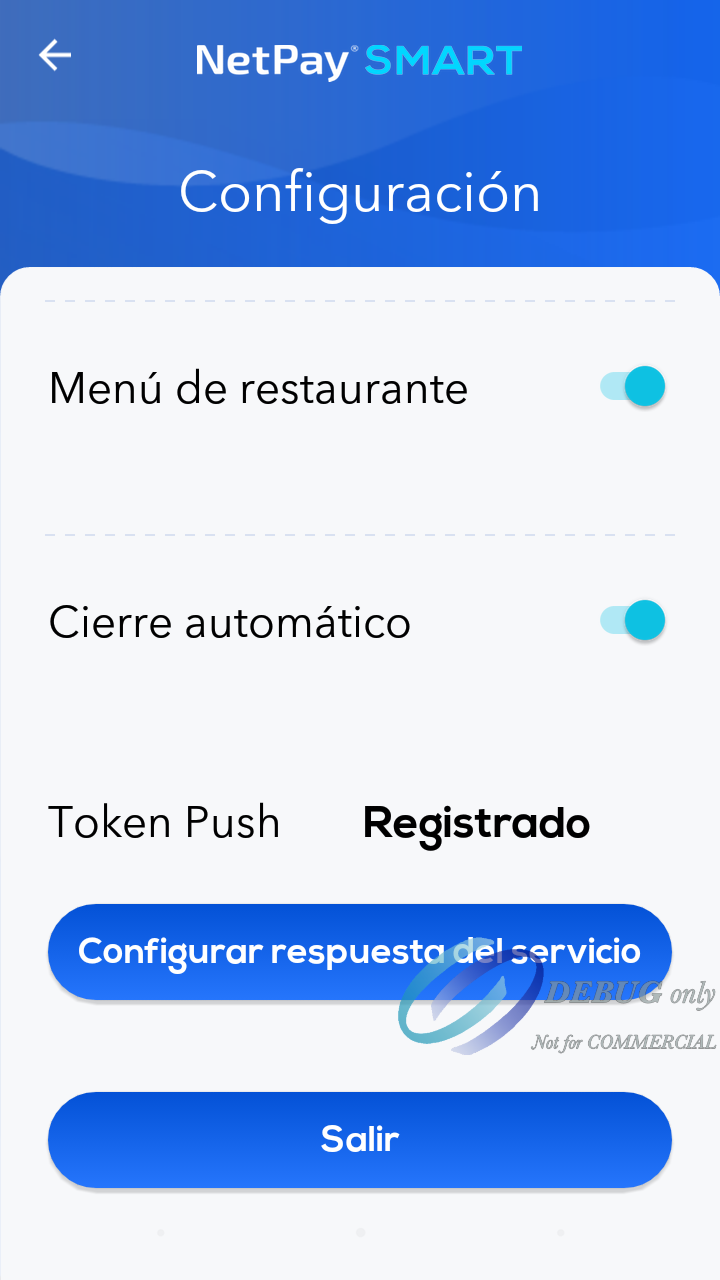
Restaurant menu | This setting allows you to enable the following options on the initial NetPay screen:
| Options available
Special features, for more detailssee table |
Automatic Closing | This option helps the terminal not to become saturated with the number of transactions that it saves in memory. With this option enabled, each time a certain number of transactions arrives, the terminal will perform an automatic cutoff. | Available |
Token Registered | This section is for access token generation, so it should appear as "Registered" for this API integration. | Available This option is essential for the correct operation of the terminal |
e) Activación del inicio automático
NoteThis setting applies only to SmartPinPad DEV versions 1.3.2 or later.
For this integration, when activating the Web option as mentioned in paragraph d) above, the automatic start of the Smart PinPad application will be activated, which will allow the SmartPinPad Dev application to be opened automatically when the terminal is restarted or turned on again.
When the terminal is restarted or turned on, the automatic start of the Smart PinPad stays in standby mode at the launcher start for approximately 25 seconds, waiting for the terminal to finish the loading process of the other services and applications, As shown in the following image, this is so that when the application is launched it works correctly.
.png")
Note.Before the Smart PinPad automatically rises, we recommend taking no action as this may cause problems when the application starts.
Once the 25 seconds have passed, the application is automatically launched and the application can be used without any problem.
f) Blocking physical navigation buttons
NoteThis setting applies only to SmartPinPad DEV versions 1.3.2 or later.
In the same way when activating the Web option and activating Block navigation buttons, as shown in the following image, the physical navigation buttons will be blocked, this is an optional function that if it is required to be activated, both options must be selected, otherwise the navigation buttons will not be locked.

The physical navigation buttons are the touch buttons found on the bottom of the terminal, as indicated by the arrow in the following image.
.png")
NoteTo enable the Block navigation buttons option, the WEB option must be activated, otherwise this option cannot be selected, as shown below.

g) Application Exit
NoteThis setting applies only to SmartPinPad DEV versions 1.3.2 or later.
If the user needs to exit the application, they will have to press the two hidden buttons at the same time added to the main screen, the first is found in the words of NetPay (red box) and the second is found in the lower part of the left side (green box), as shown in the following image.
.png")
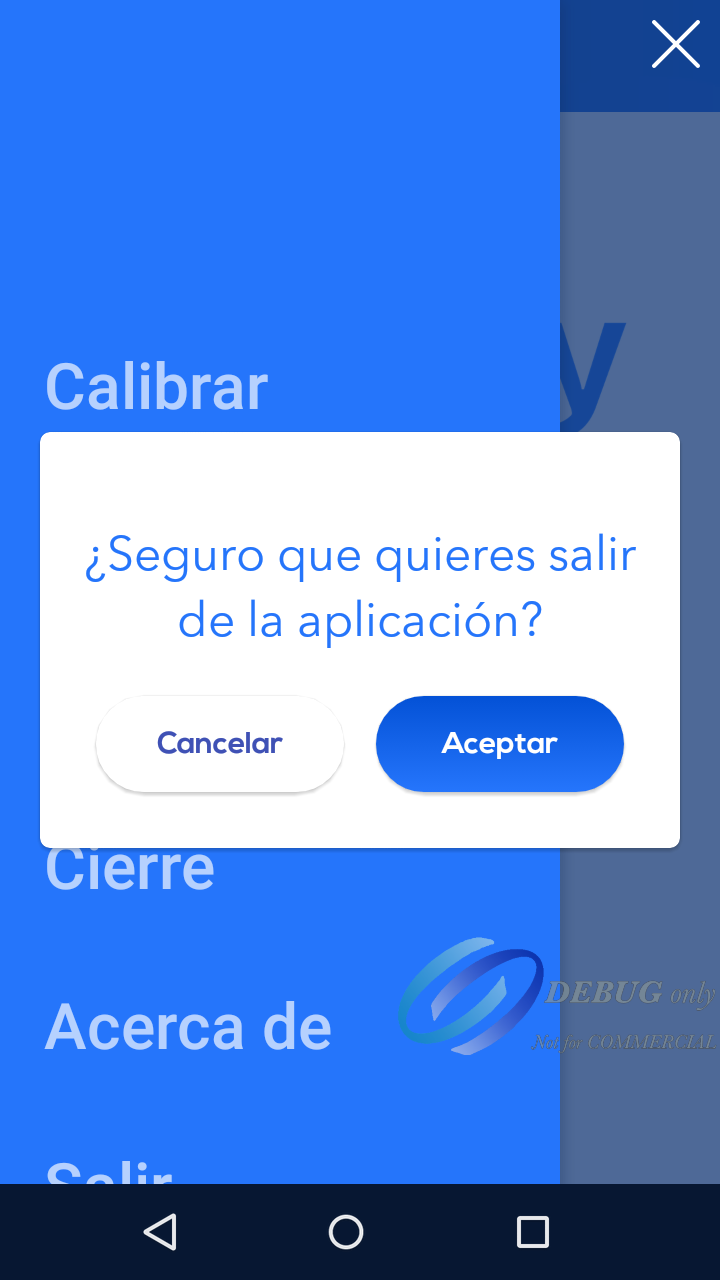
Once the buttons are pressed, the confirmation message is displayed to exit the application, in which we will accept, as shown in the following image.
.png")
Other ways to exit the app.
Option1: Enter the hidden menu options and press the exit button
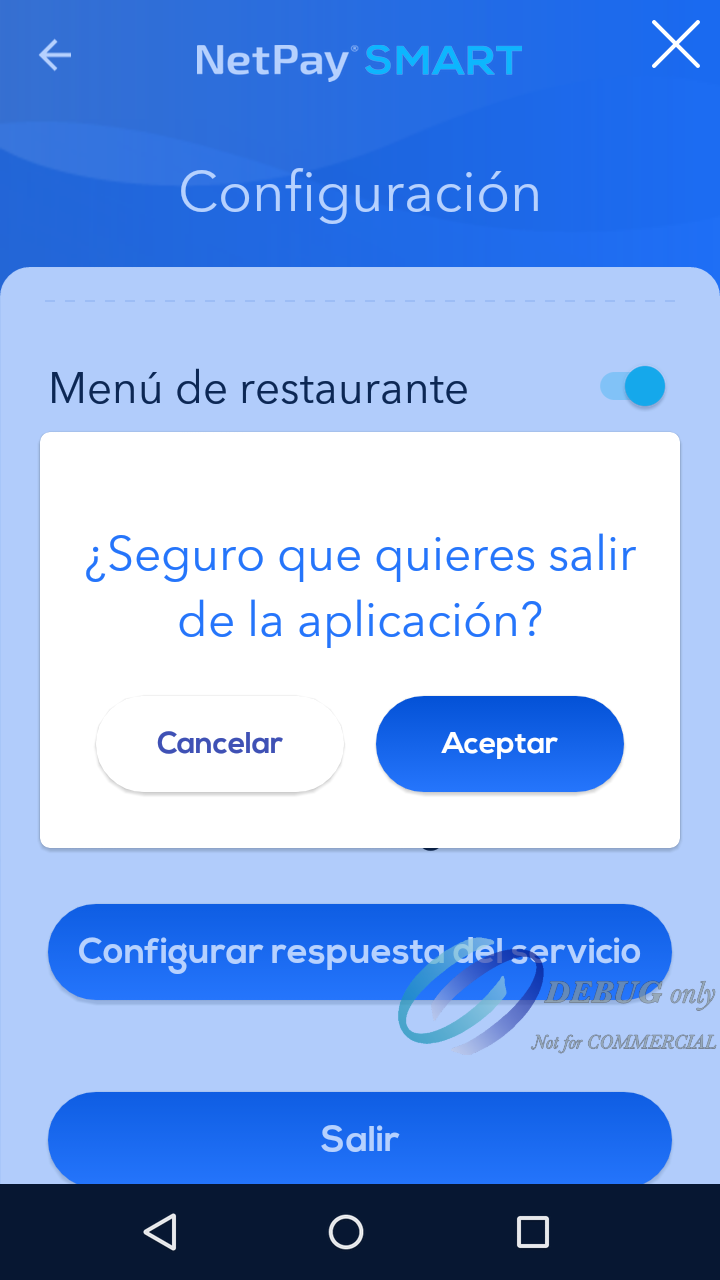
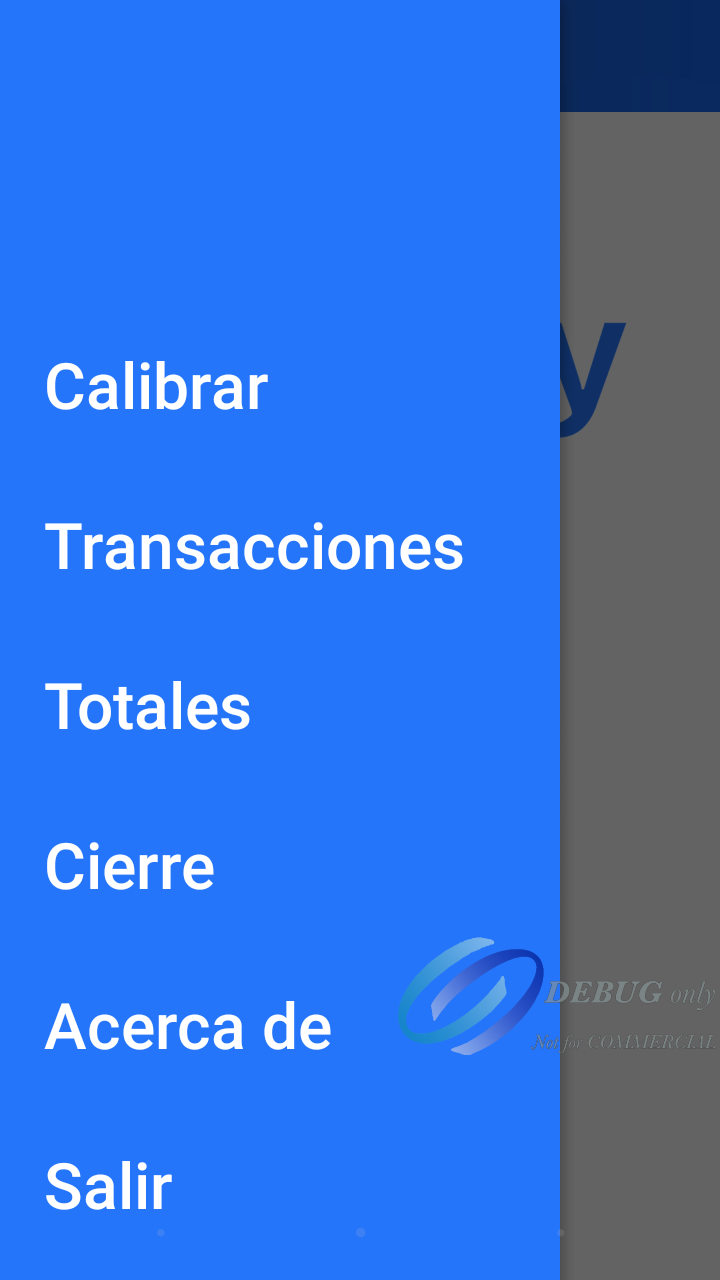
Option 2: By activating the restaurant menu option, the operations will be enabled in the menu on the top left.

At the time of accepting, it will send us to the start of the launcher and the physical navigation buttons in the terminal will be activated again.
.png")
NoteWhen the web option is activated for the first time, in order for the configuration of the automatic start of the application and the blocking of the physical buttons of the terminal to be carried out, you must return to the main NetPay screen by means of the return arrow.
If the user exits the application either by pressing accept in the confirmation message or in another way, when reopening it the changes are made and it can continue to be used as usual.
.png")
The application will return to the NetPay screen.
.png")
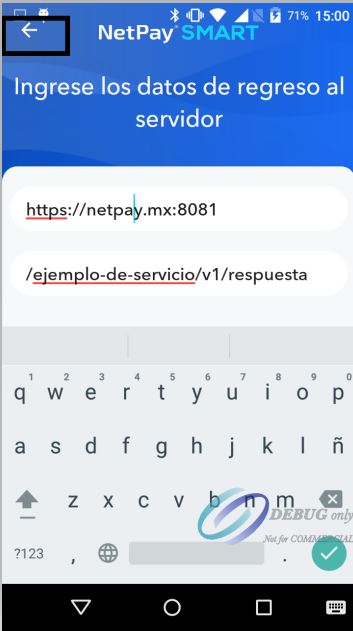
h) "Configure service response" button
As a last option in the Settings screen, the "Configure service response" button will be displayed at the bottom, in which we must proceed to press to carry out the configuration.

A new screen will be displayed requesting the End Point information back to the server with the transaction information.
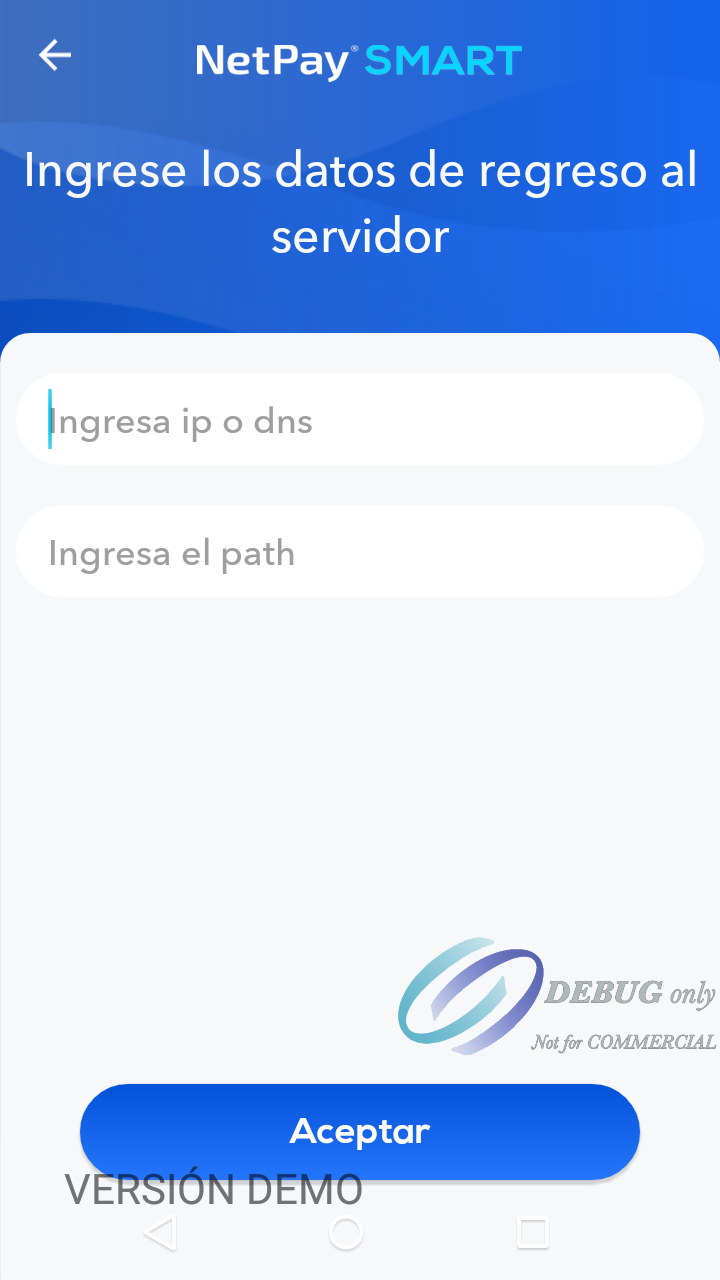
- Enter ip or dns: Place your domain.
.
Example: Entering DNS and port
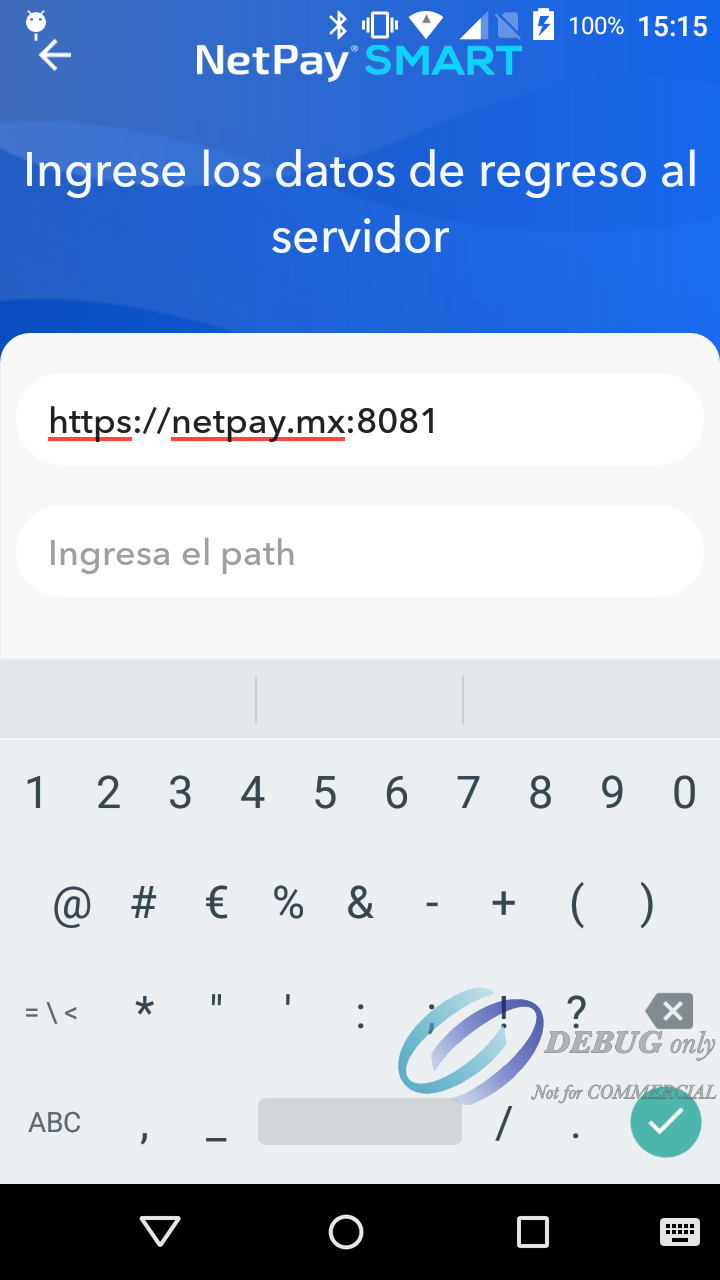
Example: Entering IP and port.
http://192.31.48.151:8081
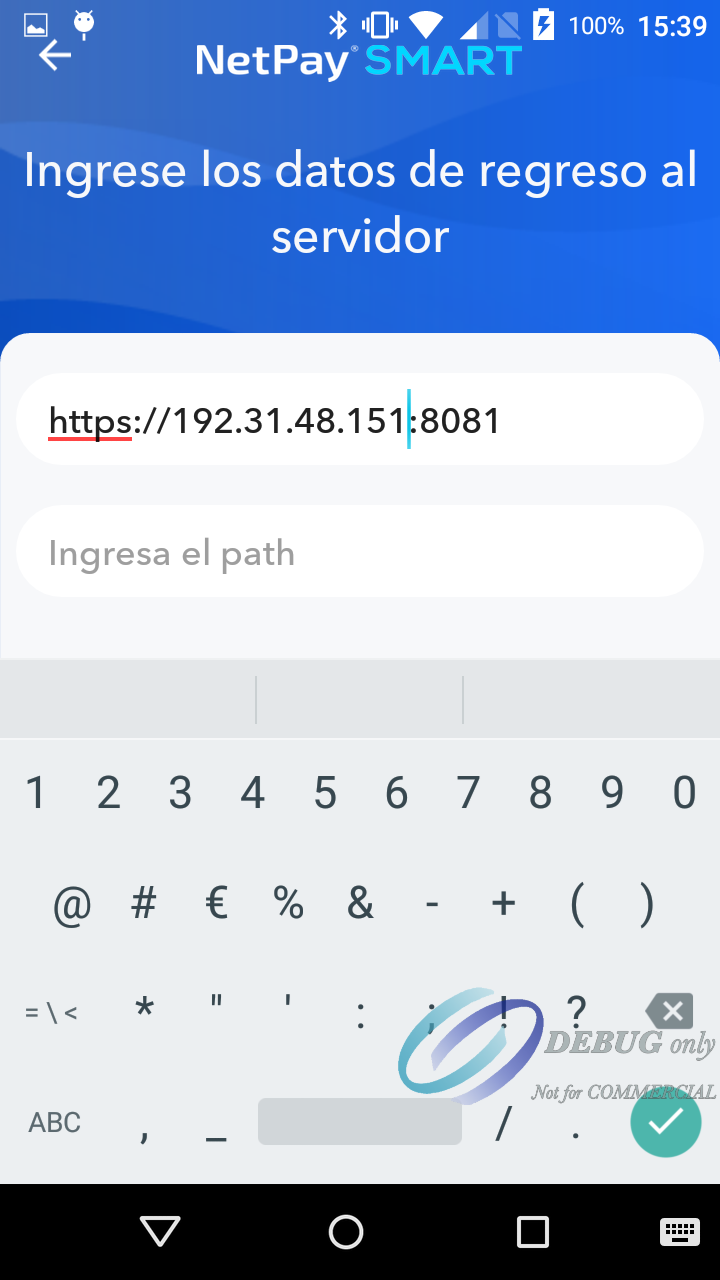
- Enter the path: Path of the service that will consume the terminal.
For example if your URL is the following:
https://netpay.mx:8081/example-of-service/v1/response
It would be divided as follows:
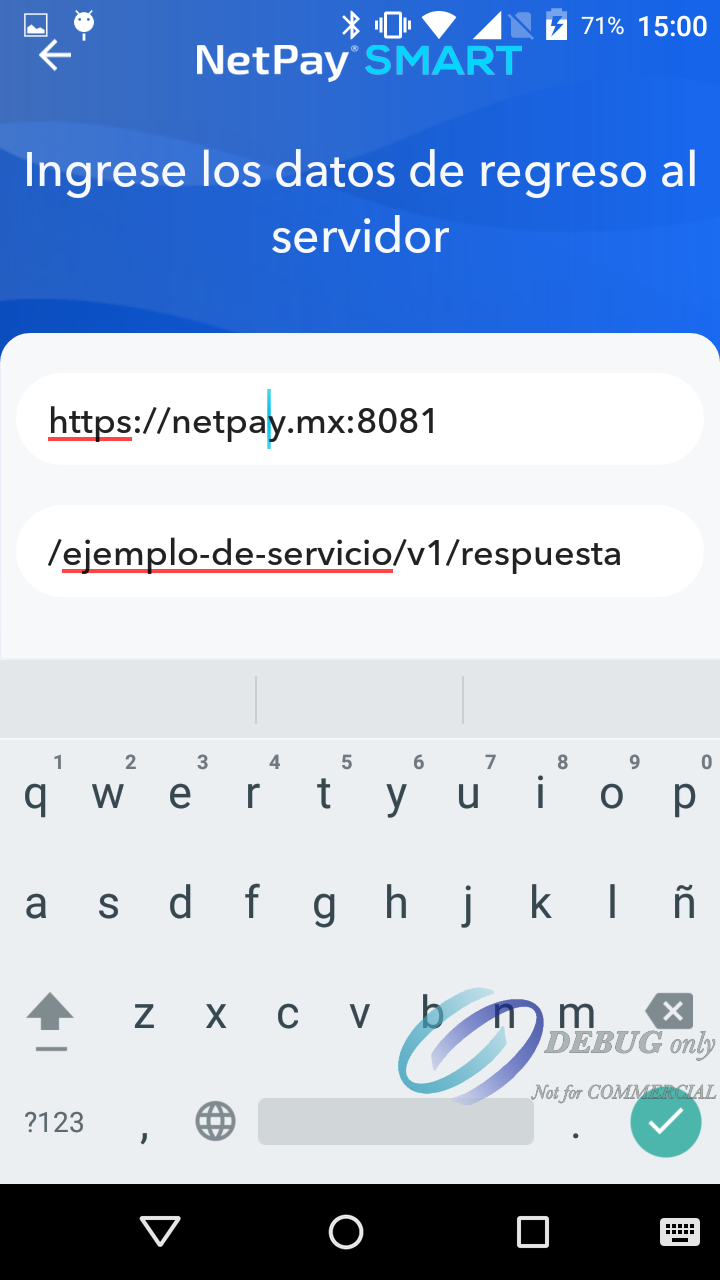
Enter the path: /service-example/v1/response
If the information entered is correct and the service responds according to the requirements, a message will appear indicating that the information has been successfully stored.
Press the "Accept" button of the message Data Saved successfully

Note.When saving the response service url for the first time in the app configuration, the terminal will send the following JSON to the service:
{
  "folioNumber":"",
  "internalNumber":"",
  "tableId":"",
  "listOfPays":[],
  "tipTotalAmount":"",
  "totalAmount":""
}
*When the service is consumed**
- It must return an HTTP Status Code 200.
- The returned HTTP verb must be POST.
- When consuming the service, the body must contain the JSON with the following parameters. (The message inside the message parameter can contain any text and the code parameter must return a 00).
{
    "code": "00",
    "message": "Recibido"
}
Then press the back arrow until the main screen of the Smart PinPad is displayed (Blank screen with the Netpay header).
Note.When a sale, cancellation or reprint request is sent to the terminal, the Smart PinPad DEV application must always be open and positioned on the initial screen.

Note.Verify that the information entered in the response configuration is correct, otherwise the information on the operation would not be received at the point of sale.
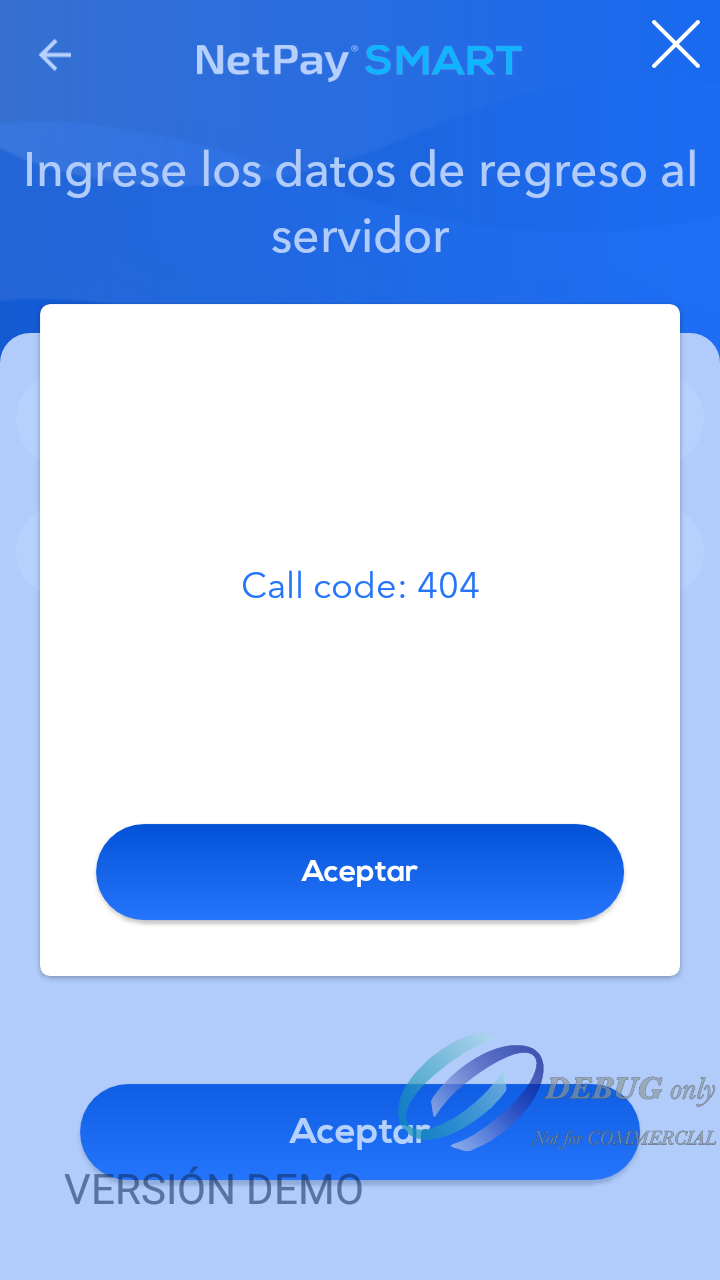
Possible mistakes
If a valid URL is not entered, the message "The smartpos could not connect to the server with the data entered" will be displayed
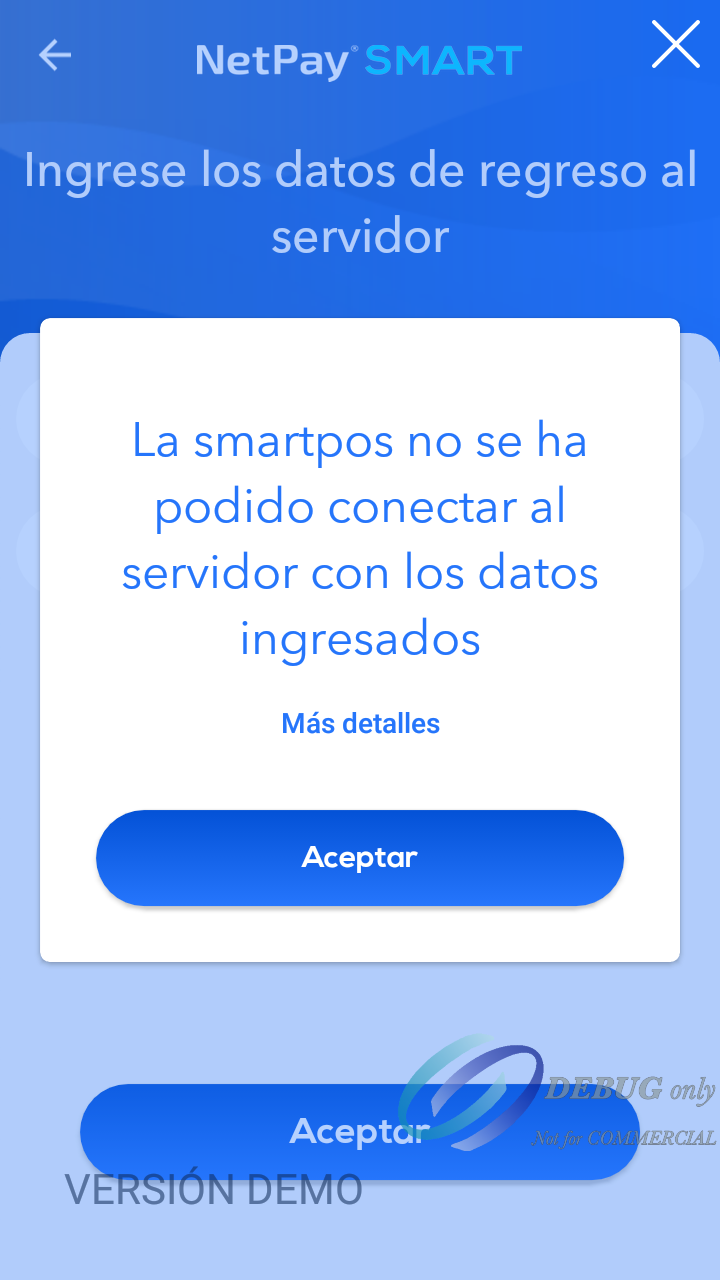
Pressing "More details" will show you the reason why it is displaying the error when entering the URL of the return service.
i) Sandbox Environment
There is a Development environment to carry out the integration and certification tests in a controlled environment where no charge will be real.
SANDBOX BASIC URL:
http://nubeqa.netpay.com.mx:3334
To switch between environments you only have to change the base url, configure the accesses of each environment and in case it is required to change between application versions.
Important.Consider that if a card with a PIN is used, it must be entered correctly since the terminal validates that it is correct and if entered incorrectly it could cause the card to be blocked.
j) Special features
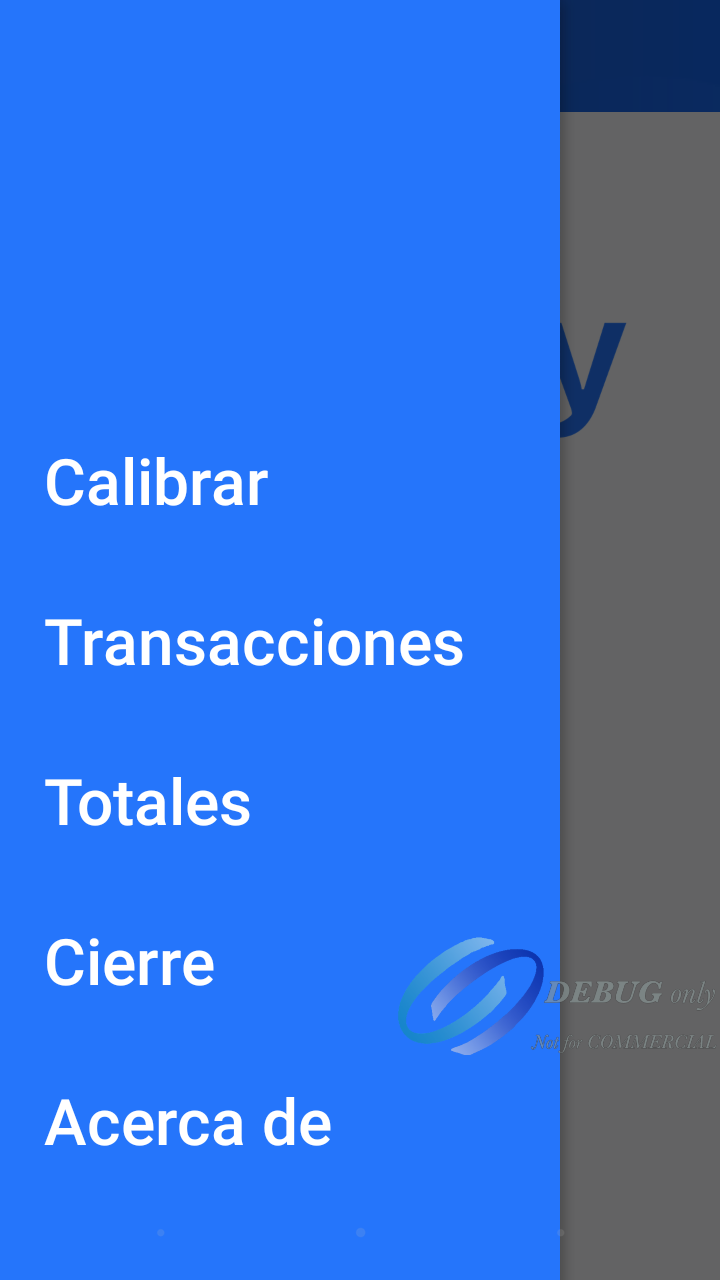
This setting allows you to enable the following options on the initial NetPay screen:
Restaurant menu:
- Calibrate
- Transactions
- Totals
- Closure
- About
Opciones | Descripción | Restricciones. |
|---|---|---|
Calibrate | Allows you to make adjustments to the URL of the answering service. | Available |
Transactions | Option that allows you to consult the transactions carried out in previous days. | Not available at this time for Smart PinPad |
Totals | Within this menu you will find the "Detail" option that allows you to reprint | Available |
Close | Allows cash cuts. | Available |
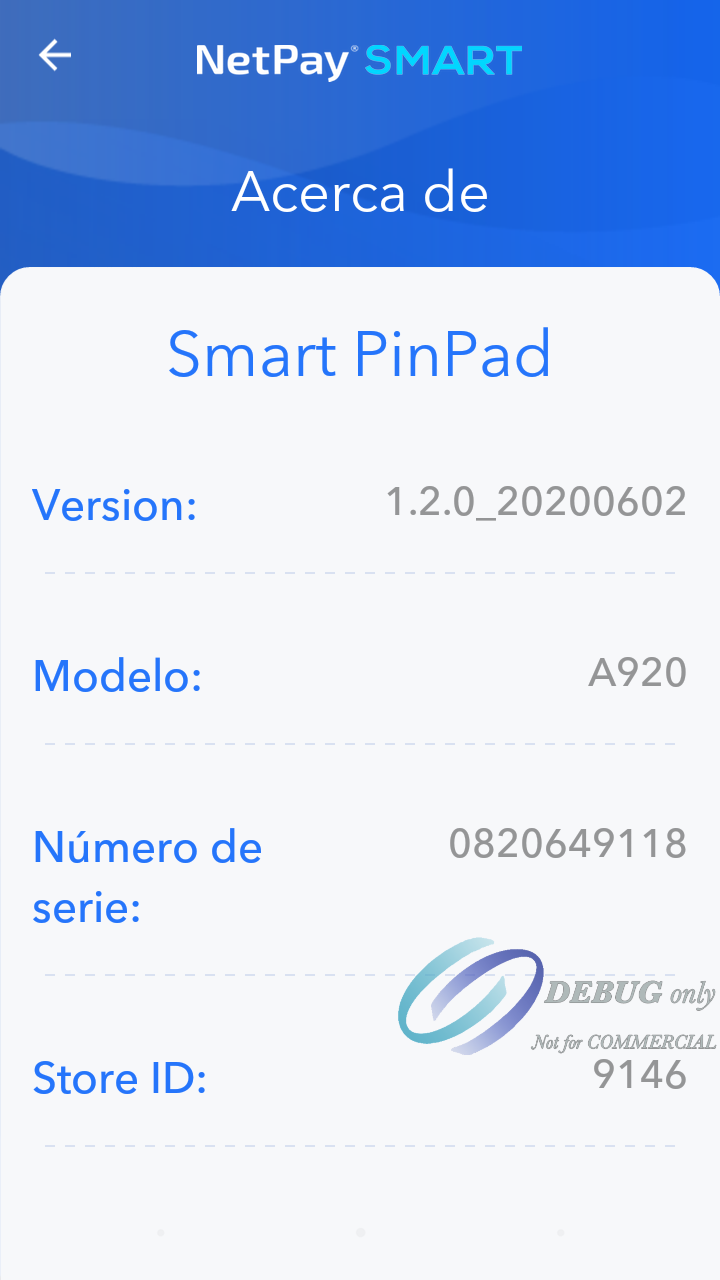
About | The About option shows the details of the terminal such as version, model, | Available |
Select the top left button.

Options will be displayed.
Option 1 Calibrate.

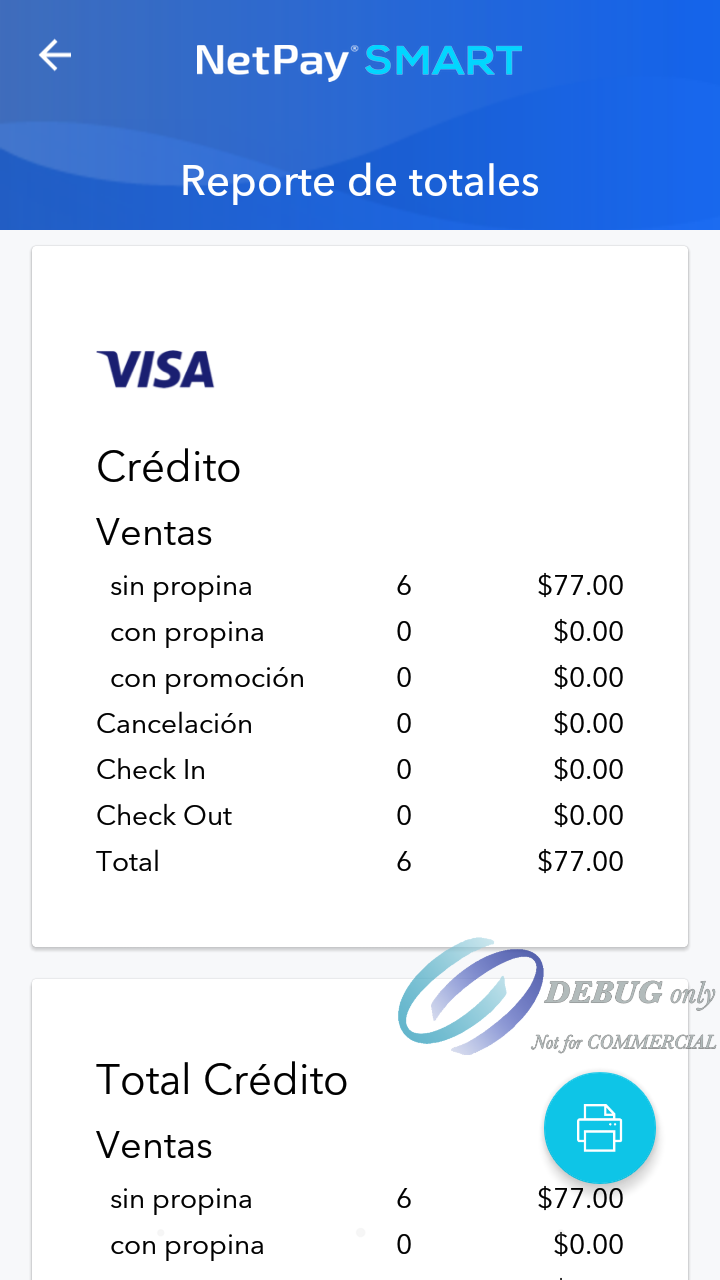
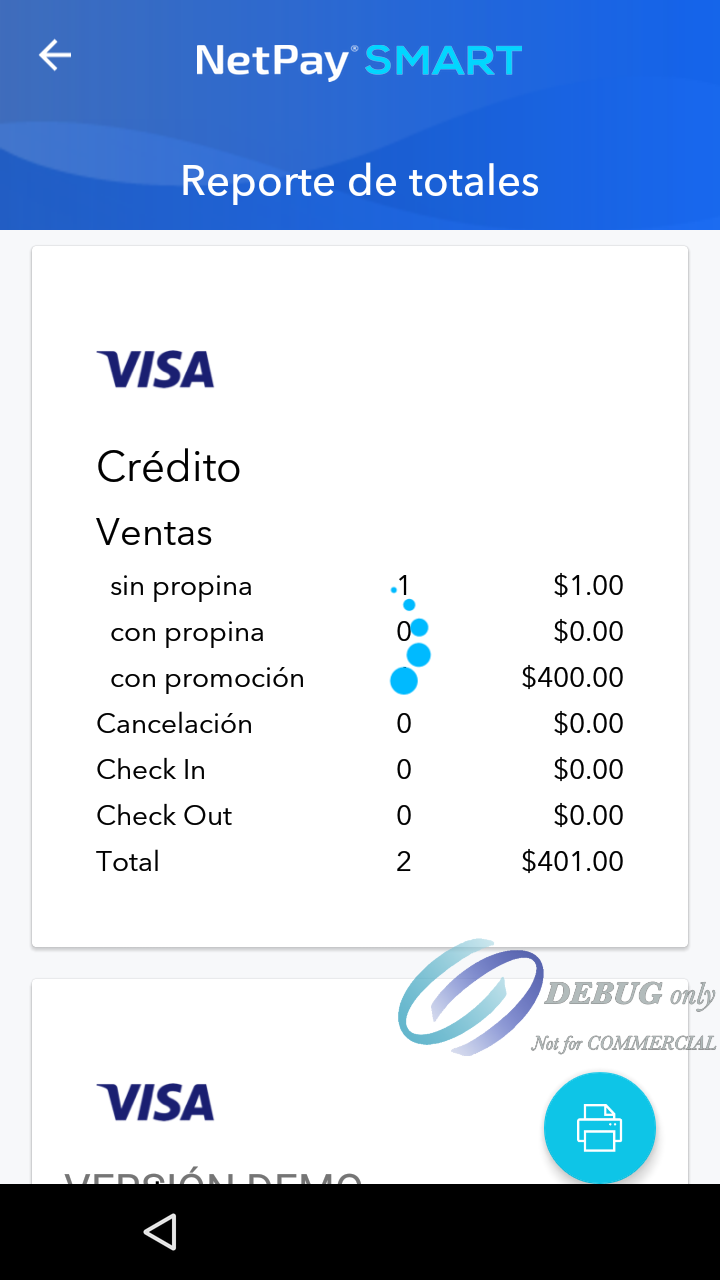
Option 2 Totals, two options "TOTALS" and "DETAILS" are displayed.
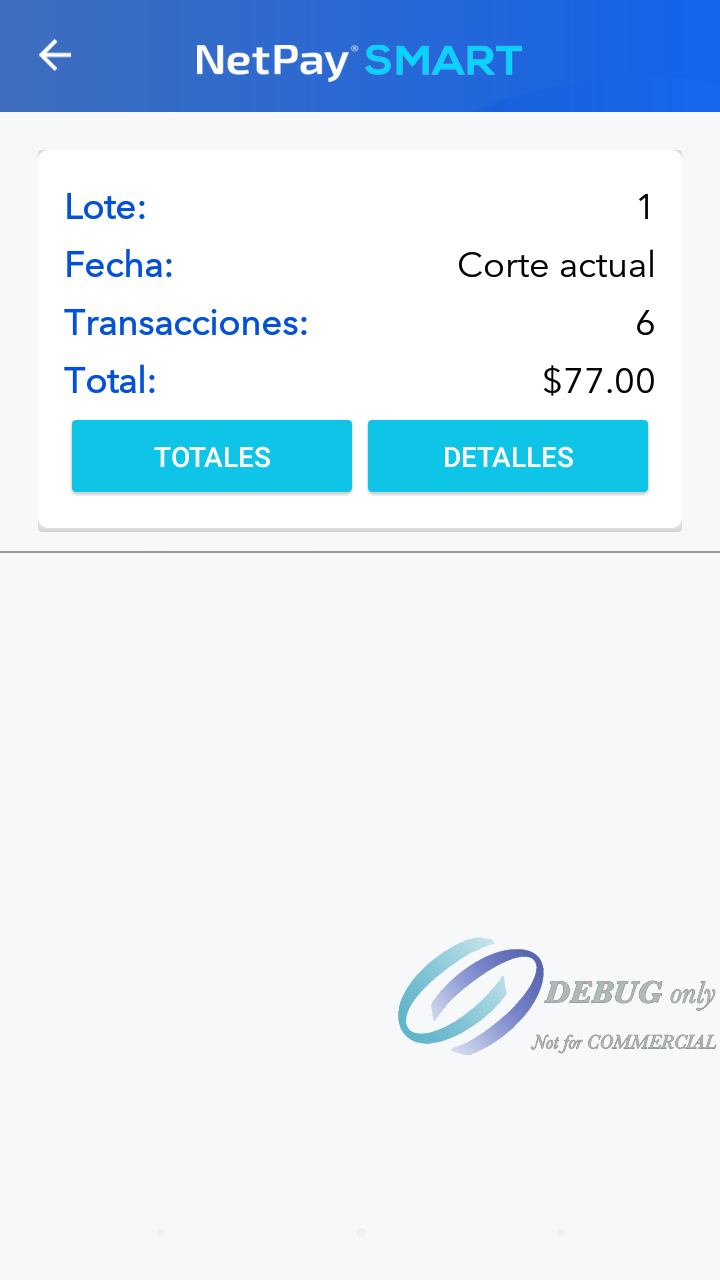
By selecting the "TOTALS" option.
".
By selecting the option "DETAILS.
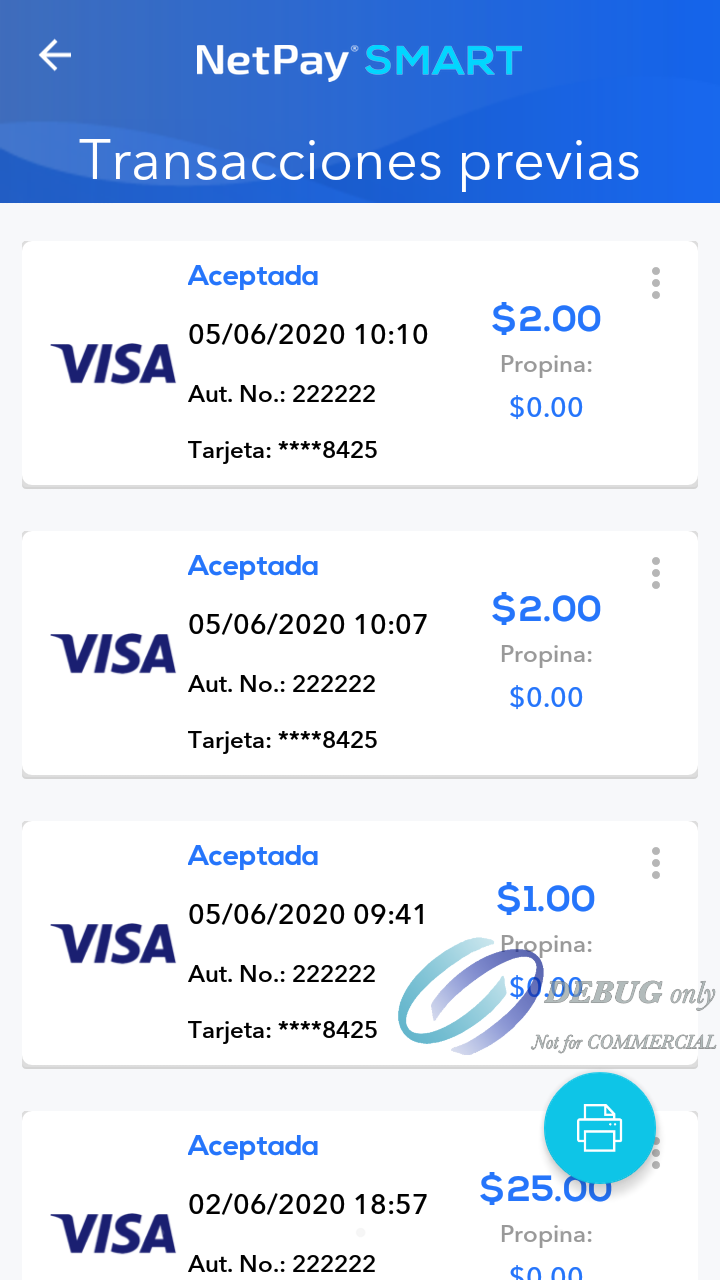
Select the desired transaction and press the three dots icon, the "Reprint" button will be displayed
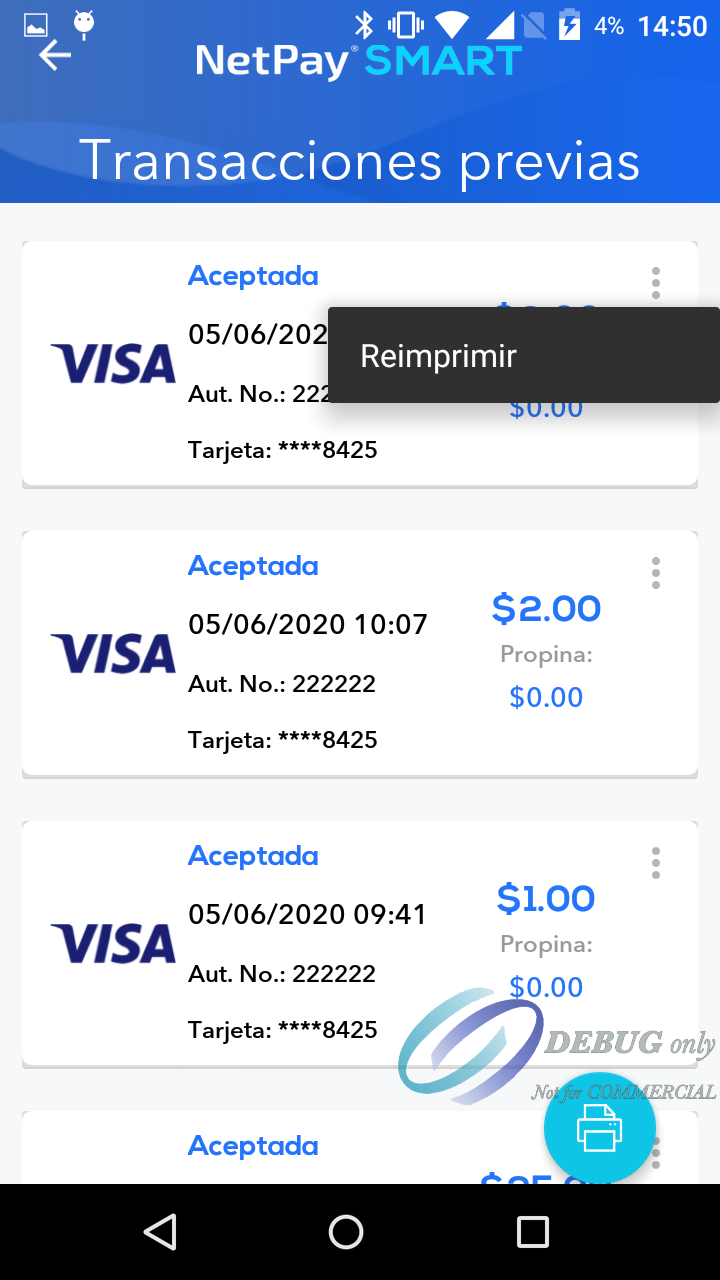
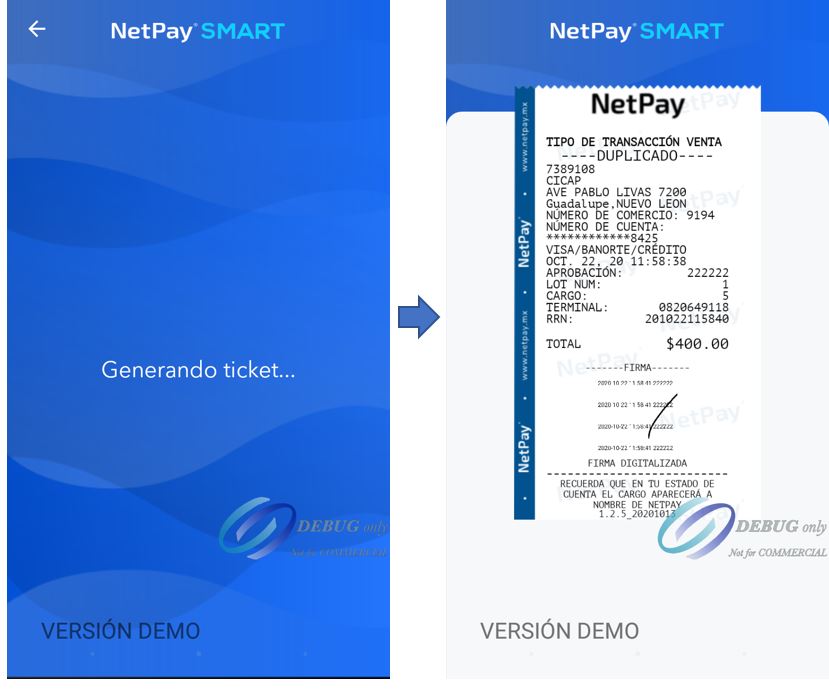
The terminal will show the generation of the ticket.
Option 3
closing
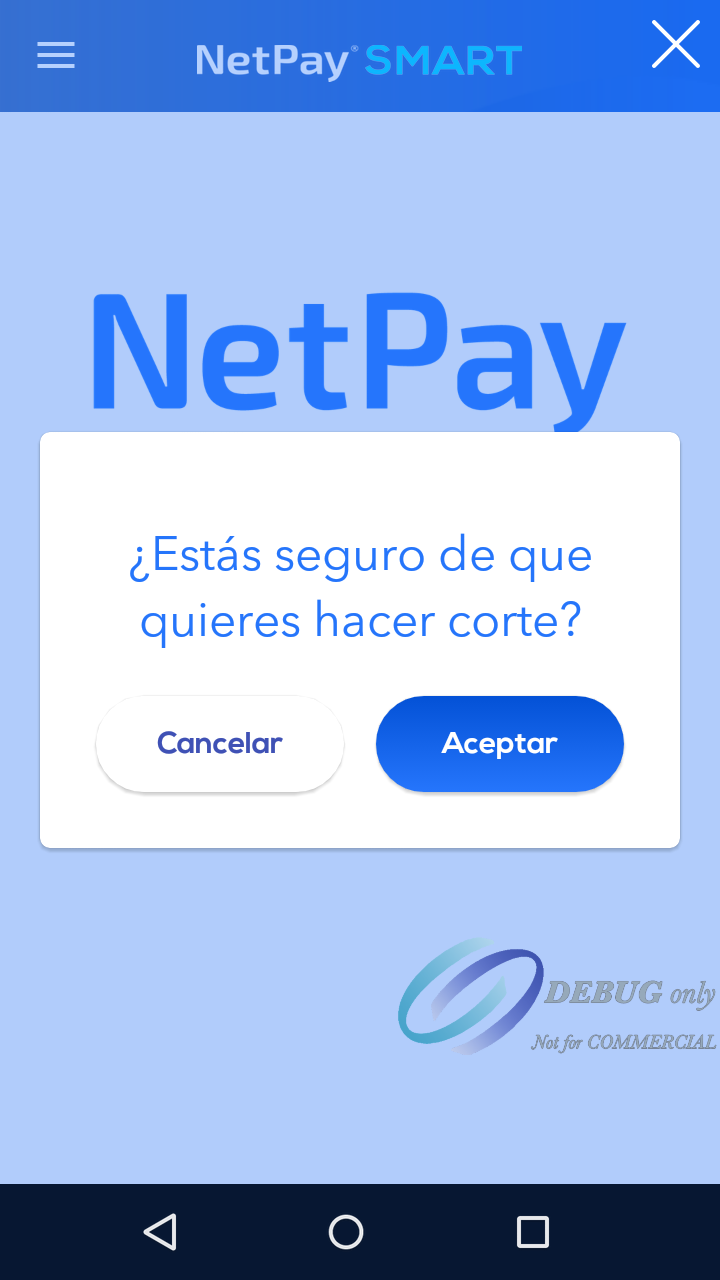
Pressing the "Accept" button will show the breakdown of the cut made.
Opción 4 About
NoteIf any situation or failure occurs during the configuration process, we recommend that you contact the integration team or your sales representative to verify that the terminal is in the test environment so that they can validate that the terminal is in the necessary conditions. to perform tests.